
UPDATE! DON’T BUILD YOURS LIKE THIS!!! IT GOT SO HOT THAT THE WAX CAUGHT FIRE! I WAS FORTUNATE TO BE THERE AND BE ABLE TO GET IT OUT OF THE HOUSE!
Over the last couple of years there have been a lot of posts about candle heaters, cornish heaters and boat heaters. What ever you wish to call them they are all pretty much the same thing – even though they are not at all equal.
Some people think that the entire idea is a bunch of nonsense because (The Law of Conservation of Energy, I think…) you know you don’t get more energy out then you put in. Of course you don’t! Each candle will give about 80 watts. That is it. The smallest electric heater that I could find online is the 200 watt Lasko personal heater which is designed to add heat a room or a cubicle. What I mean to say here is that four candles are going to give you 320 watts of heat. What the candle heater does is catch the heat and store it to disperse differently, and this is why they work.
I have come to understand from having my own candle heater at THO and from doing lots of further reading that the key to a good candle heater is LOTS of metal to conduct the heat from the flames into LOTS of thermal storage (AKA flower pots) to store and disperse the heat.
Like I explained above, I am NOT saying that a flower pot heater can be the sole heat source in an uninsulated 3000 square foot house that is 40 degrees below zero. But what I am saying is that they are a good solid heat source for a tiny house if you have good insulation and vapour barrier and the temperature is not too far below zero. If you live in a really cold climate, you would have to have more of these to heat your house. So for a tiny house or a small room they will do the trick.
The BIG BONUS for these heaters is that, not only will a flower pot heater work to heat a tiny house – but it will also take care of the dampness. Yes, you read that right. They absorb moisture. This is because the colder moist air is attracted to the warmer air in the pots and the clay absorbs the moisture. I am not sure why this works, but this would be a very interesting project for a science project.
Anyway, I decided to build a super-duper deluxe, hanging model for Tiny House Ontario a few weeks ago, and I thought I would share the how to should any of you have been considering building one. I was going to write more about how it functions in the house, but have not yet installed it there, because I was in a car accident. Unfortunately, I am too sore to drive the long distance and to operate tools at the moment too, but I wanted to share before it gets to be summer!
So this post just covers the SHOPPING LIST and the HOW TO, as well as the above blurb on why they work.
Here if you like mine, here is the SHOPPING LIST
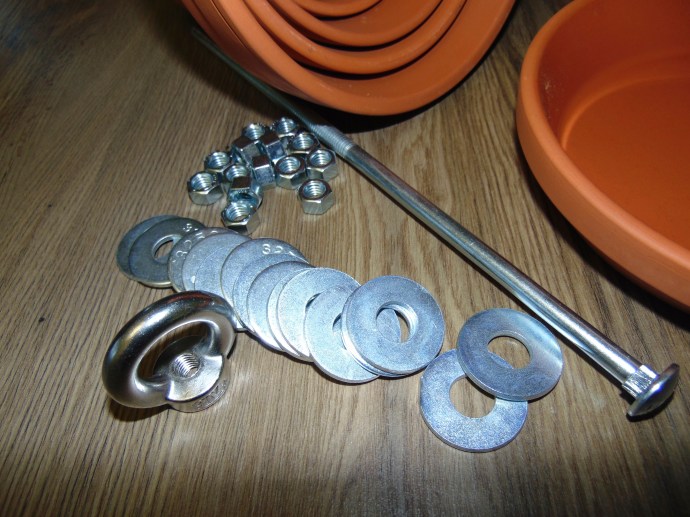
wall hanging Bracket $14.99
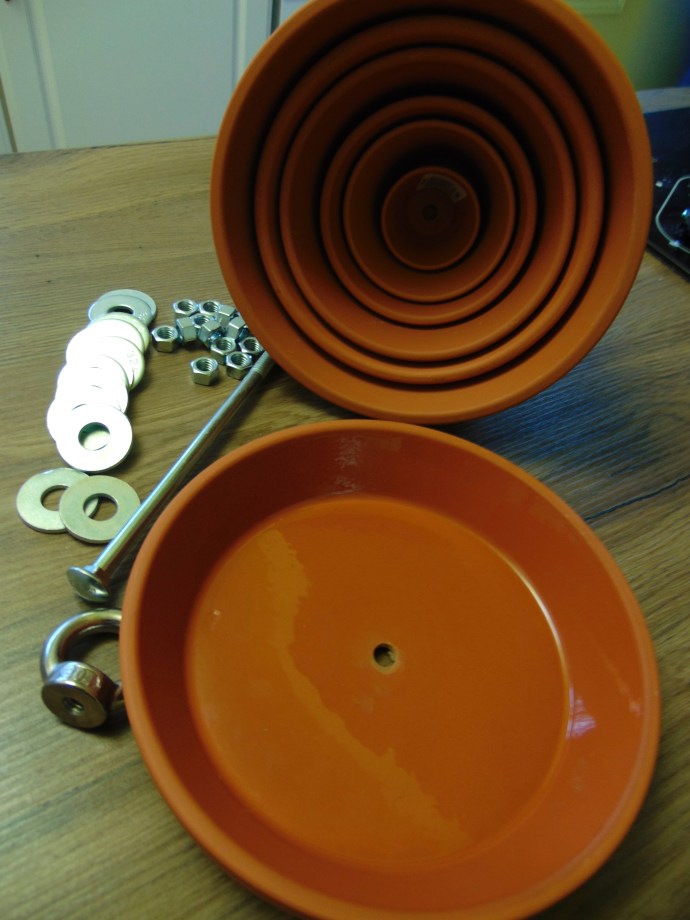
Five flower pots that fit inside one another and a glazed base that matches the circumference of the largest of the pots (with a 3/8ths hole drilled in the centre with a masonry bit) $10.25
1 of – 3/8 Hanging eye nut (found in boat supply stores) $4.99
1 of – 3/8, 12 inch long carriage bolt $4.36
12 of – 3/8 x nuts $2.30
12 0f – large 1/2 inch washers $3.90
Total $40.79 plus tax ($46.91) Sorry, I know this is a bit expensive due to the hanging bracket being $15 so if you already have one of these, you are way ahead of me. I had some fireproof caulking but you should consider getting a little of this, if you don’t. You will see why later.
HOW TO: First attach your hanging wall bracket to the wall. Ensure that this is on a stud because this is a very heavy heater!!! Don’t hang it so high that you can’t see the candles to exchange them, but put it a little bit out of the way as not to bonk your head on it every time you go by it. The pots are somewhat fragile and also, no one wants to bang their head, right?
1 – Drill a 3/8ths hole in the very centre of the flower pot base then put a washer on the carriage bolt and put the bolt up through the bottom of the base.
2 – Put a nut to the very bottom of the threaded part of the carriage bolt, add a washer and then the smallest pot. Then add another washer and then another bolt, tighten this bolt down until the pot is held tight but not so tight that you will break it.
3 – Repeat this for all the pots small through large. Each set of pots will have at least two washers with one bolt between them. (You might need more bolts if your pots don’t have a small space between them.)
4 – When the last pot is on add the last washer and a bolt. If you have space on the top of the carriage bolt add a few nuts then cap it with the hanging eye nut.
5 – Hang it up, on your wall bracket, if you have some fireproof caulking, you might want to caulk the bottom hole around the carriage bolt on the base, so that if you spill wax it won’t leak or create a fire hazard.
6 – After caulking you can add tea candles into the base and light. Please use only METAL tea candles for this because these little metal containers were designed for these conditions. Originally to keep food warm. Safety first, right? Once these are lit, the metal parts in your hanging candle heater will get HOT pretty quickly. They are a burning hazard (DON’T TOUCH THE METAL!!!!). Also after a little while (depending on your indoor temperature) the pots get hot too. Please be careful these will also burn you! Candles are open flames too! I don’t assume any responsibility here. So please use some common sense, okay?
Note: the tiniest pot inside would not work because the washers did not fit it. If I had a smaller washer I would have used it though.

Note five pots and one base.

Crappy pic – hard for hubby to hold it up since it is about 15 pounds on the end of a cantilever
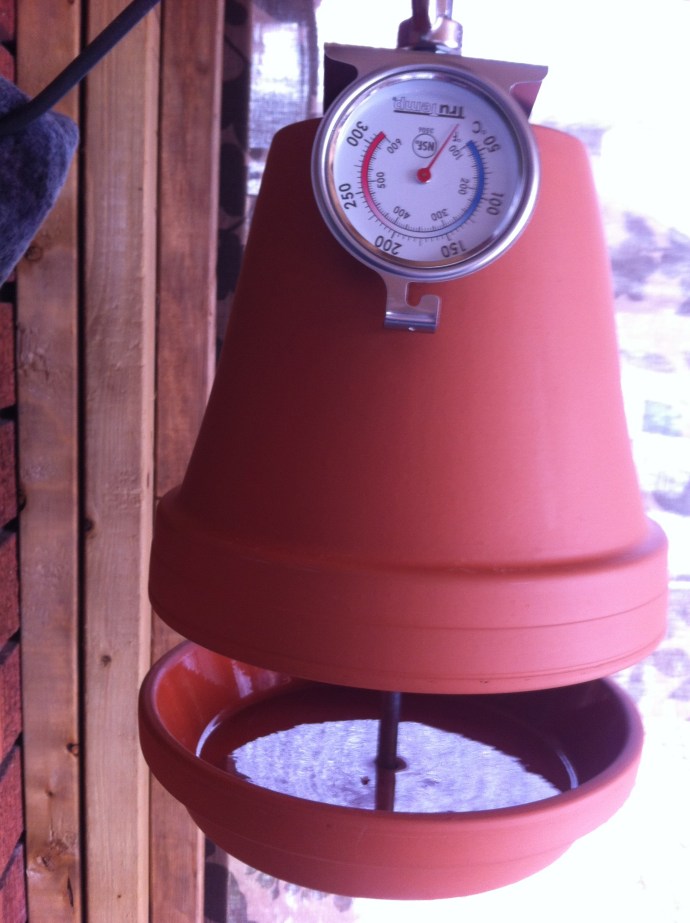
Here it is hanging outside of our house on the flower hanger with the oven temp gage hanging on it.
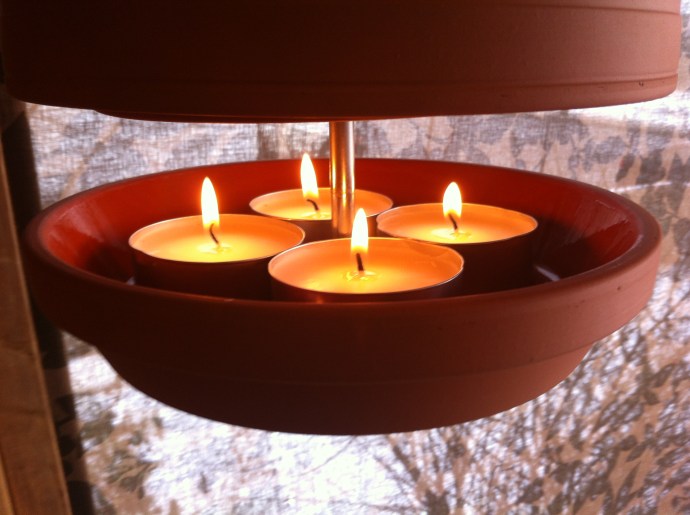
Four jumbo tealights lasted 6 hours running outside.
When I get a chance to install and run it at THO, I will certainly update.

Oh Laura, I am so sorry to hear about your accident. Thank God your injuries weren’t worse, that’s not meant to minimize what you are going through now. I’m sorry that you are in pain Laura. He’s still has lots of plans for you yet Laura;). The more you rest the faster your recovery. This world needs more people like you.
Big Hugs
Sincerely
Marie
Thank you Marie.
Hi Laura how are you ? I’m reading did you get hurt ?. I suffer with fibromyalgia and some times it can just knock me right in my bed for days oh god I hate it . Hi hope that this is not it . I hope that you well feel better soon . I’m reading and I see that you have found a gate thing here it is an awesome heather and it work gate let me tell you . Well feel better soon my dear. Light love peace. Paula.
Thank you Paula, I am very stiff on my right side.
Hope you have a fast recovery Laura thanks so much for this great idea I can’t wait to build one I have so much moisture in my small home. Blessings
Sorry to hear about your accident!! Hope you are well on the mend, Laura….
Thank you Rocky! I am stiff through the right side. My physiotherapist says that he doesn’t think it will be permanent, so I am hopeful it will be good very soon!
I hope all is well with you!
❤ L
Fascinating!
Good post, Laura. Sorry about your accident. Get better soon.